How to set up a blog like I did

Before we begin⌗
I wanted to start this by saying hello and thanks for checking this out, I am personally very new to this whole blog thing so be patient with me. I will do my very best to try and make sure that what I post here is interesting or at the very lease helpful to someone out there.
Introduction⌗
As the title suggest I am going to try and make it as easy as possible for you to be able to replicate what I have done here with this site. This site is a static site that is generated by Hugo, hosted using Cloudflare pages, and stored on GitHub. For this project there are a few prerequisites that you will need to do before so that it will make the technical steps more straight forward and easy to follow, below is a list of the prerequisites that you will need
- Hugo
- Git
- A GitHub account
- A Cloudflare account
- (optional) IDE of some sort
- (optional) A domain
Now while I was setting this up I was using a mac so I will be using the commands I used for my personal setup but I will include resources for other operating systems as well. Although you should take that with a grain of salt because I am only really familiar with MacOS, Windows, and Debian based Linux operating systems such as Ubuntu.
Getting Started⌗
Installing Hugo⌗
Installing Hugo is pretty simple, if you are using a mac like I am and have homebrew installed all you need to do for this is to run this command…
brew install hugo
for you linux users out there you can follow the steps for your distribution of choice here and my windows folks here
Installing git⌗
Again if you are like me and are using a mac it is pretty simple to install git using homebrew as well, all you need is this command…
brew install git
For my other peeps using different operating systems here is the link to the official documentation
Creating the needed accounts⌗
Like I had mentioned above you will need accounts for both GitHub as well as Cloudflare. These should also be pretty easy to set up on your own so I’m not going to go through the steps with you.
The Setup⌗
Creating the repository⌗
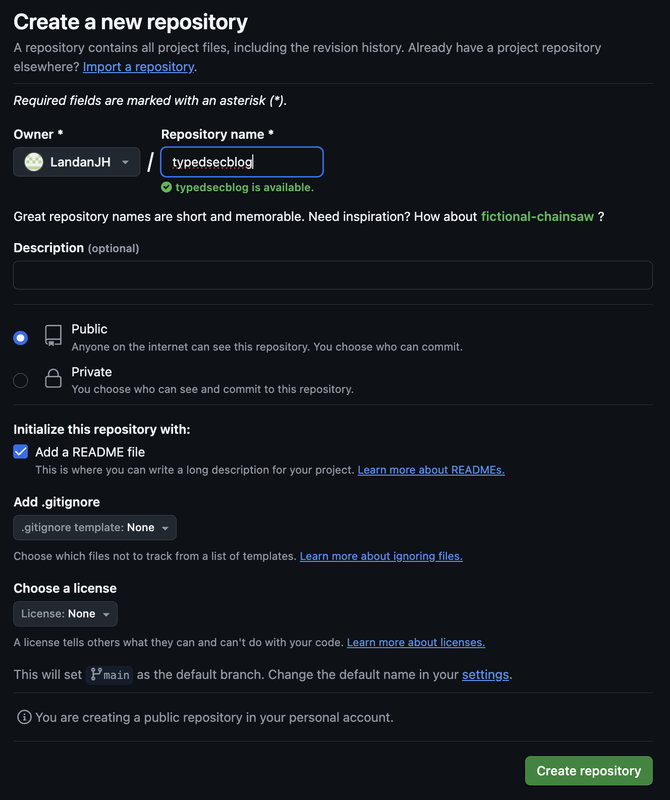
The first real step for this setup is to create the repository in GitHub, in Github click on your profile in the top right of the screen and select your repositories. From there select new and give it a name, for my repository I created it with the name ‘blog’, selected ‘private’ for the visibility, and selected the checkbox ‘add a READEME file’. Now you should have a repository that you can use for your site.
Cloning the repository⌗
After you have created the repository you will need to clone it, for this you will need to open up a terminal window and and make a new directory where you will store the files locally. For this I chose to store my files in /home/username/Documents/Github/blog
mkdir /path/to/save/files #be sure to place the files where you want
next browse to that directory
cd /path/to/save/files #be sure to place the files where you want
Finally you will clone the repository to that directory
git clone https://github.com/user_name/repo_name.git
Creating the Hugo site⌗
For this part you will be using hugo to generate the template for your site and adding a theme to make it look how you want. I would recommend that you go take a look for a theme that you prefer, as you may know I like the re-Terminal theme that I am using for this site. You can find one that you like here. To create a new site run the command…
hugo new site <name> #name refers to whatever you want to call the site
Now you will probably want to add the theme, for this you should follow the instructions that were provided to you when you chose the theme you selected, however I will go through what I did but you need to kep in mind that my setup may differ in this step. Moving on from that notice I created a themes directory in the repository and pulled the theme that I wanted to use from GitHub. From there I added the theme and some settings to my hugo.conf file so that it knew where the theme was and I also set some of the variables there as well. If you are using the same theme as me here are the steps commands that I ran and the config that I used.
Download the theme…
git clone https://github.com/mirus-ua/hugo-theme-re-terminal.git themes/re-terminal
Config I used…
baseurl = "/"
languageCode = "en-us"
# Add it only if you keep the theme in the `themes` directory.
# Remove it if you use the theme as a remote Hugo Module.
theme = "re-terminal"
pagination.pagerSize = 5

[params]
  # dir name of your main content (default is `content/posts`).
  # the list of set content will show up on your index page (baseurl).
  contentTypeName = "posts"

  # ["orange", "blue", "red", "green", "pink", "paper"]
  themeColor = "orange"

  # if you set this to 0, only submenu trigger will be visible
  showMenuItems = 2

  # show selector to switch language
  showLanguageSelector = false

  # set theme to full screen width
  fullWidthTheme = false

  # center theme with default width
  centerTheme = false

  # if your resource directory contains an image called `cover.(jpg|png|webp)`,
  # then the file will be used as a cover automatically.
  # With this option you don't have to put the `cover` param in a front-matter.
  autoCover = true

  # set post to show the last updated
  # If you use git, you can set `enableGitInfo` to `true` and then post will automatically get the last updated
  showLastUpdated = false

  # set a custom favicon (default is a `themeColor` square)
  # favicon = "favicon.ico"

  # Provide a string as a prefix for the last update date. By default, it looks like this: 2020-xx-xx [Updated: 2020-xx-xx] :: Author
  # updatedDatePrefix = "Updated"

  # set all headings to their default size (depending on browser settings)
  # oneHeadingSize = true # default

  # whether to show a page's estimated reading time
  # readingTime = false # default

  # whether to show a table of contents
  # can be overridden in a page's front-matter
  # Toc = false # default

  # set title for the table of contents
  # can be overridden in a page's front-matter
  # TocTitle = "Table of Contents" # default


  # you can set a banner on the top of the page with a call to action
  # defaults: dismissible = false; URL is optional
  # [params.banner]
  # dismissible = false
  # text = "Check it out on GitHub"
  # url = "https://github.com/mirus-ua/hugo-theme-re-terminal"


[params.twitter]
  # set Twitter handles for Twitter cards
  # see https://developer.twitter.com/en/docs/tweets/optimize-with-cards/guides/getting-started#card-and-content-attribution
  # do not include @
  creator = ""
  site = ""

[languages]
  [languages.en.params]
    languageName = "English"
    title = "re-Terminal"
    subtitle = "A simple, retro theme for Hugo"
    owner = ""
    keywords = ""
    copyright = ""
    menuMore = "Show more"
    readMore = "Read more"
    readOtherPosts = "Read other posts"
    newerPosts = "Newer posts"
    olderPosts = "Older posts"
    missingContentMessage = "Page not found..."
    missingBackButtonLabel = "Back to home page"
    minuteReadingTime = "min read"
    words = "words"

    [languages.en.params.logo]
      logoText = "re-Terminal"
      logoHomeLink = "/"

    [languages.en.menu]
      # Submenus is available since v2.1.0
      # [[languages.en.menu.main]]
      #   identifier = "submenuParent"
      #   name = "Submenu"
      # [[languages.en.menu.main]]
      #   parent = "submenuParent"
      #   identifier = "anItem"
      #   name = "AnItem"
      [[languages.en.menu.main]]
        identifier = "about"
        name = "About"
        url = "/about"
      [[languages.en.menu.main]]
        identifier = "showcase"
        name = "Showcase"
        url = "/showcase"

[module]
  # In case you would like to make changes to the theme and keep it locally in you repository,
  # uncomment the line below (and correct the local path if necessary).
  # --
  # replacements = "github.com/mirus-ua/hugo-theme-re-terminal -> themes/re-terminal"
[[module.imports]]
  path = 'github.com/mirus-ua/hugo-theme-re-terminal'
If you are using the same theme as me you may end up getting an error like this…
Error: module "re-terminal" not found; either add it as a Hugo Module or store it in "[...your custom path]/themes".: module does not exist
to fix this all you need to do is change the bottom section of the config to this…
...
[module]
  # In case you would like to make changes to the theme and keep it locally in you repository,
  # uncomment the line below (and correct the local path if necessary).
  # --
replacements = "github.com/mirus-ua/hugo-theme-re-terminal -> themes/re-terminal"
#[[module.imports]]
#  path = 'github.com/mirus-ua/hugo-theme-re-terminal'
From here you should have all you need to run the site locally! This is the point where you can stop if you don’t want your blog to be public, but if you would like to share this with everyone you can use cloudflare pages like I did.
Make sure you push the changes to the repository before moving on
Setting up with Cloudflare Pages⌗
To make your site public with cloudflare you will first need to login and browse to the compute tab on the left hand side

- hit create
- Select Pages
- Select Import an existing Git repository
- Link your GitHub Account
- Select your repository that you created
- Hit Begin
- Copy what I have below
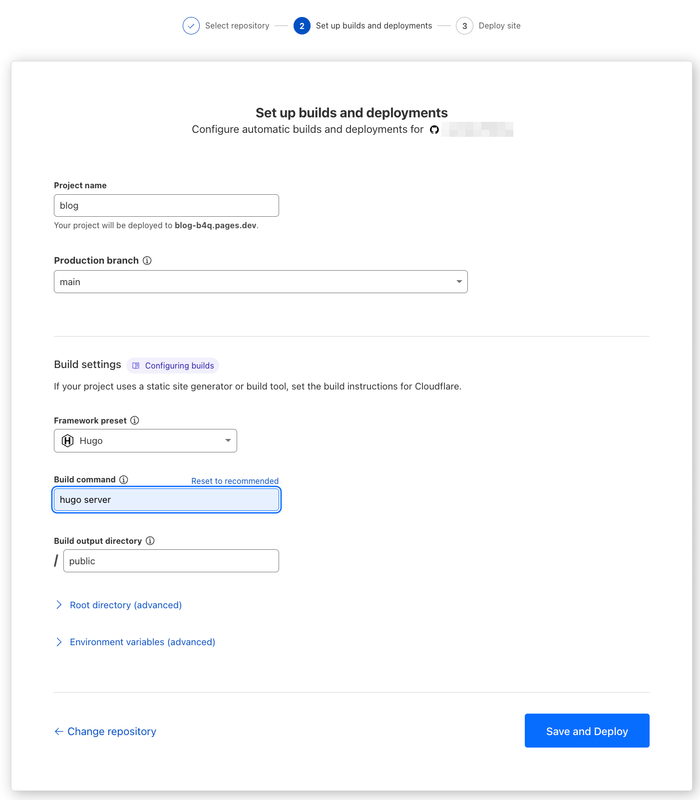 Finally you can hit save and deploy
Now as long as there isn’t errors you can enjoy your new site from any device that is attached to the internet. If you would like to add a domain so you can browse to something more memorable like https://typedsec.org then here is a link to a video where you can buy a domain and set it up on cloudflare. All you will need to do after that is to look at the deployment and under custom domains, just add your domain that you have purchased and set up from the resource above.
Now you can enjoy your blog site without having to worry about hardware or security as Cloudflare will take care of that. Anyways thanks for following along and hopefully you fine something else that you like here, peace out.
Special thanks to hun for the inspiration⌗
Go check out his site at hunio they post great things dealing with homelab, active directory attacks, malware analysis, and more!